Soon you will see more recreational vehicles on the roadways with coming summer. RV is a great way to see the world, experience new things and spend time with the family. But its roof snatches all adventure if leaks or damages.
RVs roofs made of rubber or fiberglass, always susceptible to breaks and leaks it is very important to be on the lookout for things that can damage sometimes, damage is unavoidable. A simple guide to RV leak repairs is here.
Properly Maintain Your RV
Approach the system of repairing a leak step-by-step, it is important to understand things one can do to avoid issues. The best RV leak repairs are the ones you don’t have to make. It is a good idea to store it out of harm’s way.
By falling branches burdened by heavy snow or in a spring thunderstorm RV can be damage. Direct sunlight can weaken roof materials. To reduce the risks If possible, consider storing your RV in a garage or storage.
Before hitting the road each season, it is vital to check the RV for potential problems. At least one more thorough check each year is must. Inspect the roof and walls carefully, and re-seal the seams. There may be any penetrations where two pieces of material meet or where.
Step-By-Step RV Leak Repair
Everyone will have to deal with them at some point. Luckily, RV leak repair is a simple process. Here’s what you need to do:
Step 1: Locate the leak quickly is vital. Leaks are often much more difficult to spot. Leaks can cause major damage, such as mold and rotting materials, so locating a leak
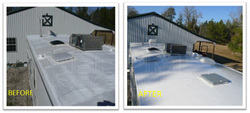
Step 2: Find the best available RV leak repair materials. Liquid roofing is cost-effective and durable, and makes a great option for simple leaks.
Step 3: Read and follow the directions – it’s as simple as to painting a wall.
Step 4: let the material dry and test it by using a water hose on the affected area. With proper RV maintenance and the right tools to conduct simple RV leak repairs, you will enjoy your trips for years to come. Click here for more
RVs roofs made of rubber or fiberglass, always susceptible to breaks and leaks it is very important to be on the lookout for things that can damage sometimes, damage is unavoidable. A simple guide to RV leak repairs is here.
Properly Maintain Your RV
Approach the system of repairing a leak step-by-step, it is important to understand things one can do to avoid issues. The best RV leak repairs are the ones you don’t have to make. It is a good idea to store it out of harm’s way.
By falling branches burdened by heavy snow or in a spring thunderstorm RV can be damage. Direct sunlight can weaken roof materials. To reduce the risks If possible, consider storing your RV in a garage or storage.
Before hitting the road each season, it is vital to check the RV for potential problems. At least one more thorough check each year is must. Inspect the roof and walls carefully, and re-seal the seams. There may be any penetrations where two pieces of material meet or where.
Step-By-Step RV Leak Repair
Everyone will have to deal with them at some point. Luckily, RV leak repair is a simple process. Here’s what you need to do:
Step 1: Locate the leak quickly is vital. Leaks are often much more difficult to spot. Leaks can cause major damage, such as mold and rotting materials, so locating a leak
Step 2: Find the best available RV leak repair materials. Liquid roofing is cost-effective and durable, and makes a great option for simple leaks.
Step 3: Read and follow the directions – it’s as simple as to painting a wall.
Step 4: let the material dry and test it by using a water hose on the affected area. With proper RV maintenance and the right tools to conduct simple RV leak repairs, you will enjoy your trips for years to come. Click here for more
 RSS Feed